Share your account with other users
As a Hitflow account owner, you have the ability to share access with other users. By consulting this guide, you will learn everything you need to know to share access to your account.
- Summary
- General information on access sharing
- Send an invitation
- Revoke a user access
How access sharing works
To authorize access to a Hiflow account, a three-step procedure with email validation must be followed. In addition, the account owner can define roles for users to limit their permissions on the account.
Authorisation procedure
Here are the steps required to access a Hitflow account:
- Inviting a user: The owner adds the email address of the guest user who must have access to his account.
- Creating an account (optional): In the event that the guest does not have an account, he/she must create an account using the email address of the invitation.
- Acceptance of the invitation: Now that the guest has an account, he can validate the access authorization by clicking on the link sent to his email address.
- Notification of the owner: When the invitation is validated, the account owner is alerted by email to confirm the creation of the share.
Roles of users
Users of an account can be assigned roles giving access to different modules:
- The role of the "Owner" is automatically assigned to the owner of an account and cannot be changed. The owner can manage the account without any limitation.
- The role of the "Technical" gives access to: Dashboard, Availability, SSL Certificates, Domain names, Servers, Status Pages and Maintenance.
- The role of the "Admin" gives access to: Contacts, Reports, Accounts, Users and APIs.
- The role of the "Billing" gives access to: Offers and Billing.
Attention! Currently, the configuration of a user's roles is not possible and will be updated soon... Thus, when an owner gives access to a user, the latter can manage the account according to the following three roles: "Technical", "Admin" and "Billing".
Managing access to your account
Giving access to a user
To manage access to your account, you must log in to your Hitflow account and then go to the "Users" section of the "Settings" section.
- Click on the button to open the form.
- Enter the email address of the user to whom you want to send the invitation.
- Confirm the sending of the invitation by clicking on the button.
If the user already has a Hitflow account, you must provide their email address. Conversely, if the user does not yet have an account, he/she will have to create an account using the email address for which the invitation was sent
- Upon receipt of the invitation email, once the user has created a Hitflow account, they will be able to validate the invitation.
Invitations are valid for 72 hours and after that time they are automatically deactivated.
- When the guest has access to your account, you will receive an alert and see the user appear in your list.
Congratulations! You have just shared your account with another user.
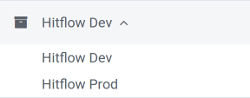
How to switch between accounts
When you have access to multiple accounts, a new item in the navigation menu will tell you which account is currently selected. By clicking on it, a drop-down menu opens to allow you to switch to another account.
Remove access rights from a user
As the owner of your account, you have the possibility at any time to temporarily or permanently revoke a user's access. You must go to the user list to perform this action.
Temporarily suspend access
To temporarily disable a user's access, click the disable button . You can perform the reverse action at any time by clicking on the same button. By performing a temporary deactivation, the user will no longer be able to perform any actions on your account but will still see your account as deactivated in his access list.
Revoke an access permanently
The permanent deletion of an access is done using the delete button . Once the deletion has been confirmed, the user will no longer have access to your account and will no longer see it in their access list.
If you wish to give this user access again, you will have to repeat the invitation procedure.